Back in the day, seagoing sailors had limited space and resources. Every inch aboard a ship is allocated for the function of the Navy’s war machine. Thus, things that weren’t essential were done away with or not even considered. The sailor’s uniform was created with such practicality in mind and its design and maintenance is based on a need for simplicity and functionality. So, things like closets, lockers, irons and steam presses didn’t make sense to have on most ships for uniform care. The Navy needed a method in to uphold hygiene and to make their sailors presentable in places where cleaning abilities can be crude and space is at a premium.
Since ships require its crew to work and live in close quarters for long periods of time, cleanliness is a priority as infection or illness in one person can quickly spread to the rest. This reason was actually one the Navy’s pushbacks on accepting draftees during the early stages of the war. Thus, hygiene is a priority and sailors in recruit training were immediately taught the cleaning of their clothes. Although, I will say from personal experience that this training didn’t always stick with everyone.
As the Navy modernized, and new technology brought more capability to provide simple creature comforts aboard fighting vessels, the uniforms themselves stayed roughly the same. They were still made to handle handwashing and air drying, and to be folded the Navy way to create a professional military look when required. Let’s go over how sailors were taught to clean, fold and stow their uniforms. I’ll add some tips and tricks on how we can do things in the modern age.
Cleaning.
The Navy outlines cleaning techniques in the Uniform Regulations of 1941 as well as in the Bluejackets’ Manual: the U.S. Navy sailor’s go-to book. For this war, the manuals were published in 1940, 1943 and 1944. Each covers the importance of cleaning your clothes but the 1943 and 1944 versions actually provide techniques, like removing chocolate and rust stains, which were copied from the actual uniform regs. This is most likely due to the surge of manpower and expedited training to get them out to the fleet. Since cleaning one’s clothes was taught and practiced during boot camp, shortened time there meant less time teaching this skill.
Recruits used scrub decks that were established near their barracks to launder their clothes on with soap, water and a brush. Some of these were indoors due to the location’s climate. NTS San Diego had theirs outdoors thanks to California’s usually sunny weather, and those cement scrub decks were still there when I went to boot camp in 1993. We only used them once, maybe twice, and only to wash white hats as that’s about the only uniform you can hand wash back then.
The Bluejackets’ Manuals, specifically the 1944 issue, has several paragraphs explaining how to properly wash your clothes, again owing to the shortened recruit training times and the need to get this info out to each sailor. It reiterates to ensure the pockets are empty prior to washing (I still make this mistake from time to time) and to not mix blue and white uniforms together. It also prescribes that for blue uniforms to brush very lightly and to use lukewarm water as hot water will shrink them. It also stresses to not stretch or pull them out of shape while wet.
It stresses that rinsing is done thoroughly. “If blues are not properly rinsed, the white soap powder will show when they are dry. Whites will turn yellow if not properly rinsed.” While in today’s society we do have the option to use liquid detergent, bear in mind that I’ve also seen liquid soap that isn’t clear discolor the whites uniforms.
After the clothes were scrubbed and rinsed, they were hung to dry on clotheslines. Sailors used small sections of cotton cord, called stops, to secure them to the line. Square knots were used and the garments were “two-blocked,” meaning tied directly to the line and not left dangling. You’ll notice that some Navy uniforms from this time have small holes stitched into the sides along the inside seams – two on each side of the jumper hems or at the trouser waists. These are where you’d run the stops through to secure to a drying line. The white hats had loops sewn into the crown for this purpose. Dungarees and their chambray shirts did not have these, nor did the blue cap.
Every inch of the clothesline was to be used and there were to be no gaps, referred to as “holidays,” between the uniforms should more needed to be added later. Blues hung with blues and whites hung with whites to prevent any chance of dye dripping onto the lighter clothing. Ideally, two or more lines keep them separated. But, if only one line is available, the clothes would be grouped by color with the lighter colored clothes higher on the line. While wet, it was important for the trousers and jumpers to hand stretched to help get wrinkles out. This was usually a two-man job. With the uniform inside out a partner would hold the top while the owner of the garment reached into the opposite end of the trouser legs, or the jumper body, and stretch by exerting outward pressure from inside out with his arms. This technique helped limit wrinkles from setting as it dries, especially in the cotton uniforms.
Modern Care.
Now that you’re aware of how it was done, let’s talk about the best practices of how to care for them now. If you have a reproduced uniform, it will come with advice on how to properly clean them. Dry cleaning is probably your best bet, and definitely the safest in regards to the blues. Unless you live near a naval base or your dry cleaner understands Navy uniforms, make sure you show them how the uniform is to be pressed as the creases are different than what they’re probably used to. Fold the uniform inside out to assist them and make sure they have a written note in case the person you explained it to isn’t actually doing the pressing. Or ask them to not bother pressing it afterwards and do it yourself.
Sometimes dry cleaning isn’t possible or within someone’s budget. So, your next best option is to hand wash. Hand washing is probably what I do the most for my whites, which are original. To hand wash these garments use only as much soap as needed to get a bit of suds. You can hand wash in a bucket if they’re not too soiled. But, if you need to actually scrub brush them down, make sure you’re laying them on a clean surface that won’t stain or dirty your garment! Lightly scrub the blues with a scrub brush; you can go a little heavier on the whites if needed but if a stain is that bad, you’ll need something stronger than just a vigorous scrubbing.
I have never used bleach on my whites. I have heard some issues regarding using bleach, so I opted to stay away from it. I did use it on a trashed white hat and it helped it some. I used a very mild solution for that and let it sit for an hour. For stains that just won’t come out, which mainly are found on the whites, I’ve used OxyClean with success and I’ve used a Tide To Go stain remover for specific marks with excellent, practically lifesaving results*. I have read excellent reviews using a product called Retro Clean, especially in regards to brightening the white on a rating badge while preserving the blue material. Always start with soap first and see what it does before moving on to a stronger product. When going to that next level, do a small portion that is inconspicuous, like the inside bottom hem of a pant leg. Some stains are just not going to come out, sadly, especially if they are deep set on original uniforms.
* Side note: I got married in my service dress whites in Hawaii. However, when I pulled them from the dry cleaning bag I found several water spots or possibly light coffee drops on the front from who knows where. I was mortified and didn’t know what to do as the ceremony was only an hour away. Thankfully, one of my groomsmen came to the rescue and whipped out a Tide To Go stick, of which he swore by. I used as directed and within seconds these stains were no more… and thus my life was saved from certain doom. Granted, the uniform is polyester and WWII ones are cotton, but I now carry a Tide To Go stick with me in my travel bag.
Washing machines are very rough on clothes and I don’t recommend using one. If you do, put it on the most gentle cycle and do not spin dry. Again, only use the least amount of soap needed to get suds up and do not mix colors. Under no circumstances should you use a dryer. There is too much potential to mess your uniform up. Plan ahead and spend the time to wash and dry them correctly.
Folding.
After drying, uniforms were folded in a standardized method then rolled. Each item was folded inside out, which protected the outside from errant dirt or lint that might happen on to it while being stowed. Once folded, the garment was rolled then tied secure. The same stops (now dry) are also used in this process so, again, practicality comes into play. Rolling helps reduce any wrinkles in the uniform as opposed to traditional flat folding and it helps set creases where they needed to be to make the uniform presentable. This is why the jumper collar and body have creases going outward and the sleeves and trouser legs have creases on the seams going inward. I have yet to see any photo that shows blues or whites with pressed creases like a traditional suit, like how officers’ uniforms are pressed. I will not go so far as to say it never happened. But, seeing how the manner of folding and rolling is so pressed (pun intended) upon each sailor’s mind from boot camp and then reinforced on through regular inspections, I would find it unlikely that a sailor would go out of his way to make his uniform look different… especially when the correct way is so much easier to do. Remember, to go on liberty, sailors had to leave via a ship’s quarterdeck watch and then sometimes pass by an installation’s gate guard and shore patrol, all who would be watching for men out of uniform and just itching to issue out an infraction.
I’ll attempt to explain how to fold and roll your articles of clothing. The following illustrations were scanned from my copy of the Recruit Handbook, published in 1944 and issued to recruits of the Naval Training Center, San Diego, and helps describe the process.
The Blujackets’ Manuals 1940 and 1943 state:
You are given a clothes bag to stow your clothes. All clothes before stowing in a bag should be folded and stopped as follows:
Turn all clothes, except overcoats and underclothes, inside out before folding; brush clean, roll up tightly, smoothing out all the wrinkles, and secure them with a white cotton stop about 2 inches from each end of the roll. The stops are tied in a square knot and the ends tucked inside the roll.
This note is not mentioned in the 1944 manual. I guess it must be implied that the clothes are to be turned inside out when hung for drying.
Starting with the pants, all three manuals state this:
Trousers, white.— Fold one leg over the other so that seams on the inside of the leg come together and pockets are on the outside. Tuck in the crotch. Turn waistband back to middle of leg and turn back top trouser leg about 6 inches. Roll toward bottom, keeping right edges even.

Trousers, blue.—Fold one leg over the other so that seams on inside of leg come together and pockets are on the inside. Do not tuck in the crotch. Turn waistband back to middle of leg and turn back top trouser leg about 6 inches. Roll toward bottom, keeping left edges even.

Undershirts.—Same as jumpers, except directions concerning collar.
Drawers.—Same as trousers, except roll from the bottom of the leg upward.


White and blue jumpers.—Place on sleeve directly over the other, the front of the shirt being on the inside of the fold and the collar extending about the neck with the two side edges together on inside of collar. Fold collar lengthwise of shirt. Fold arms back over collar twice, and roll back from neck toward lower edge of the shirt.


Here are the instructions for the overcoat, which is the official term for the “pea coat,” in case you’re wondering.
Overcoats.—Lay the overcoat out flat, outside up, sleeves along side, collar turned down as when worn. Fold back each half of the font over the sleeve nearest it, and then fold one half of the coat over the other half. Fold upper third of the coat over the center third, and lower third back over upper third. Secure with a long stop, lengthwise and crosswise, using a square knot.


The 1940 and 1943 manuals add “Note.—Your name will not show on white trousers if you have your clothes rolled and marked properly. At bag inspection you will be required to undo your stops, and your clothes will then be inspected for cleanliness and for proper marking.
The 1944 manual doesn’t include that statement but says “After clothes are rolled, they should be secured carefully and uniformly by clothes stops. It is suggested that these stops be three fingers from the edge of the clothes or the length of the knife blade from the edge.
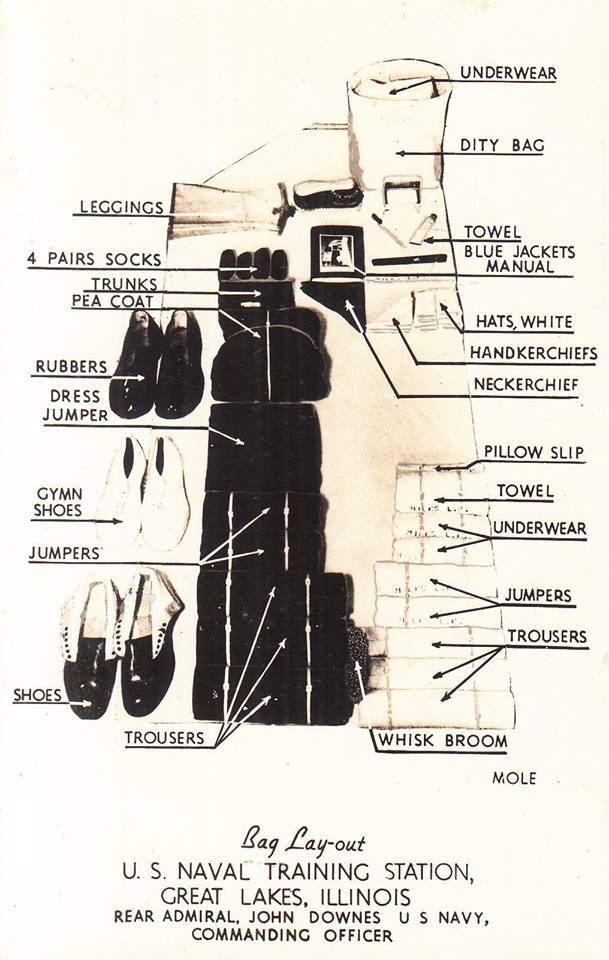
Stowing.
Folding and rolling your clothes was the Navy way of keeping your uniforms in a presentable condition without having to use irons or presses which may or may not be available at your assigned command. Storing them inside out help keep any errant dirt or marks from ruining the “inspection” side. Further, having them rolled made storing them and, more importantly, digging them out when you need them, much easier to do than if you were to flat fold and stow them in your bag. The 1940 Bluejacket’s Manual states:
“Your clothes, folded above, will be stowed in the bag as follows: Place clothes in a bag horizontal and in layers; layers at right angles to each other. When winter uniform is prescribed, summer clothes shall be stowed in the bottom of the bag, and vice versa.” It also states, “Keep overcoat in divisional locker or stow in bottom of clothes bag, as may be ordered.”
Just for reference, I’ll mention the 1944 version of how to stow clothes:
“You are given a sea bag** in which to stow your clothes. There are no locations prescribed for stowing the gear in the sea bag. There are, however, certain common-sense procedures which should be followed. Out of season clothing should be folded and placed at the bottom of the bag. In stowing a bag, the rolled clothes are placed in layers, each layer being at right angles underneath.”
** Side note: The ’44 excerpt refers to a sea bag. Prior issues and the 1941 Uniform Regulations refer to it simply as a bag, or sometimes as ‘clothing bag,’ but they are the same thing. To this date, I have not seen printed use of this term prior to 1944.
Rolled and layered, you can easily grab the items you need without having to pull up layers of folded clothes. And rolling your garments prevents creases in places like the leg or jumper body where you don’t want them. Sourcing original stops can be difficult as most people don’t know what they are and toss them. But, they are still out there. If you do use them, ensure the brass is clean from corrosion so it doesn’t transfer to your clothes, namely your whites.
Replicating stops can be tricky. The cotton cord is out there in the market, but finding the right size brass crimps can be a challenge. Originals were hard laid 3-strand white cotton cord. I have seen examples that were either 1/8 to 1/4 inch in diameter. They were issued as one long cord with brass crimps stamped in pairs every 18 inches but I have seen other collectors state theirs were closer to 12 inches. The sailor would cut the cord between the two brass crimps as needed. Smaller lengths were used to secure most clothing and longer lengths were used for securing bulkier items like the overcoat.
There are times, though, when rolling isn’t ideal, such as storing them on a shelf or within drawers, or if you only have one or two sets and not a whole seabag of uniforms. Further, if you think you’re going to be accessing these uniforms regularly, like at an event, rolling and tying them up could be a pain. That’s when I flat fold.
I use the same technique I was taught in recruit training back in 1993, which is essentially starts off the same way as the WWII method save for rolling step. Again, everything is folded while inside out and unbuttoned:
Trousers, blue and white.—Fold one leg over the other so that seams on inside of leg come together and pockets are on the inside. Do not tuck in the crotch. Turn waistband back to middle of leg and turn back top trouser leg about 6 inches. Fold over in half.
White and blue jumpers.—Place on sleeve directly over the other, the front of the shirt being on the inside of the fold and the collar extending about the neck with the two side edges together on inside of collar. Fold collar lengthwise of shirt. Fold arms back over collar twice. Fold whole garment in half.
I generally do not like hanging my original uniforms, especially for long term storage. Gravity can take its toll on older garments and can stretch or damage the shoulders over time. If I do hang them, it’s because I am going to regularly use the uniform at an event. Unless it’s a coat, I hang everything inside out. Once the event is over and I’ve laundered everything, I stow them rolled or folded flat as needed.
The nice thing about wool is that it doesn’t wrinkle easily and creases made by folding usually don’t last long once worn. Cotton twill will hang on to those creases and will add new wrinkles as you go about your day. I will sometimes iron my whites as some unwanted wrinkles can appear from folding and rolling. I also do it to help reinforce the creases in the arms and the collar, but I don’t go as far to use any kind of stiffener like starch. Current service members may obsess over how easily these uniforms will wrinkle up, but there’s not much you can do and starching them wasn’t a common practice. It’s just the nature of the uniform and, when looking at original photos, a common and accepted problem.
One of the things I do iron regularly is my neckerchief. During the war, it’s clear that sailors often pressed their neckerchiefs either after they’ve folded and rolled it but before tying it, or on the ends after it’s been tied. Use the lowest heat setting possible. Original wartime neckerchiefs are silk, but some late to post war versions could be made of rayon. Reproduction neckerchiefs are definitely synthetic. I do not use the steam function but will some times dab a little water to help smooth out stubborn wrinkles. Once you’ve tied the neckerchief, you can store it tied – either by hanging it or laying it flat – and it should last you for several uses.
Summary.
The care of your uniforms is as important as knowing what to wear when portraying service members. You may have the proper insignia and garments, but will look completely off if it looks like you put it on after it was balled up in a trashbag. Sailors – well, the good ones, anyway – take good care of their uniforms and stow them to reduce damage and wrinkling. Understanding how they did so while living aboard a ship is an important aspect to understanding life in the Navy!